
I recently completed a couple of kumiko trivets, in an effort to expand my repertoire of kumiko patterns and also to offer some smaller items for sale on my site. One of those used a design called the masu-tsunagi pattern. According to Des King, the word masu refers to a type of square measuring cup used in Japan, while tsunagi comes from the verb tsunagu, which means to connect. At around 6″ square the scale of this trivet makes for a reasonable size to learn how to make the pattern while also making it a functional size in use.
There are a number of excellent sites and blogs out there detailing how to make shoji screens and kumiko patterns, so I won’t go into every details regarding the specifics of how to mill and plane kumiko. However, the following should give a pretty good idea of how I made this pattern. For more information I highly recommend Des King’s books on shoji and kumiko, as well as Brian Holcombe’s blog or Granite Mountain Woodcraft.
I happened to have some thin strips of walnut (that I probably saved from the scrap bin) that I chose to use for this project. Here are the planed kumiko strips ready to go. Many kumiko patterns rely on a square grid within which the pattern itself fits, that foundational grid is called the jigumi. I decided to make my jigumi kumiko 1/4″ thick, while the strips that make up the masu-tsunagi pattern are 1/8″ thick.

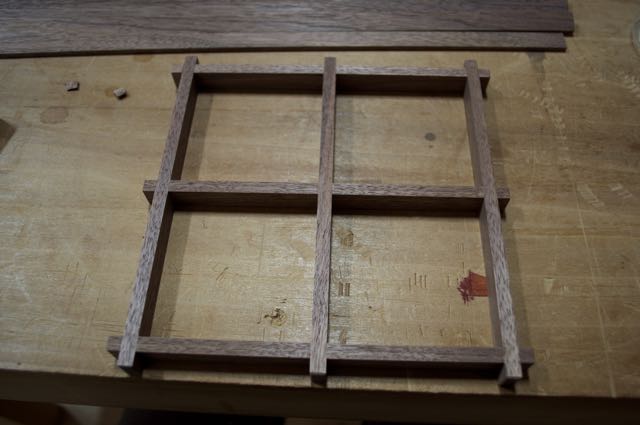
The jigumi pieces are held in a simple jig and marked for the half lap joints which hold the pieces together. Only one side of each half lap is marked and cut at first. I should also note that one end of each kumiko strip was cut cleanly square, and those ends are butted up against the stop at the right side of the jig. The other end is left long but the finished length gets marked and cut in the jig.

I knife the cut line and use a chisel to cut a notch on the waste side which helps guide the saw when cutting.

Here are the cuts completed for the half lap joints and the finished length.

Using a thin chisel I clean out the waste. My kumiko are 1/2″ tall, and the holding strips on my jig are 1/4″ thick, which allows me to use them as a depth guide for chiseling (and sawing as well).

It’s handy to have an extra piece of kumiko around to test the fit.

Next the pieces can be removed from the jig, and glued up.

Here is the complete jigumi portion of the pattern.
Now for the tricky stuff. I’ve made this pattern before and found it tedious to fit evenly, so this time I decided to make a jig to help. I’m pretty sure I got the idea for this jig from a youtube video showing a Japanese craftsman using something very similar.
The overall size of the jig is cut so that it just fits within one of the jigumi squares that I just completed. In order for a jig like this to work, the layout and cutting of the jigumi has to be pretty exact so that each square is as identical in size as possible. Then I laid out the masu-tsunagi pattern onto the jig block and used the table saw to cut kerfs where the kumkio will go. The table saw blade left a kerf a bit fatter than my 1/8″ thick kumiko, but that bit of slop turned out to be a good thing in the end.
Once the jig was made, I used it to determine the length of the masu-tsunagi kumiko.

With the length determined, I use a make-shift saw guide (miter-box) set with a stop to cut the rest of the masu-tsunagi kumiko to length.

Then the little kumiko are marked and cut just as the jigumi kumiko were, keeping in mind that the half laps have to match the spacing that corresponds to the kerfs on the jig.

Once the half laps are fully notched the pattern pieces can be fit together and inserted into the jig. The little bit of slop left by the table saw kerf made it so that the whole pattern fit in without too much strain.

With the jig securely holding the pattern I was able to saw off the little nubs sticking out, followed by some paring with a chisel to cleanly cut the ends to length. I was able to use the jig itself as a paring guide to trim the ends.

Finally the piece could be removed from the jig and fit into one of the jigumi squares. And it was a pretty good fit. Then I just had to repeat the process three more times.

Here’s the final piece. The jig used to hold the masu-tsunagi pattern pieces proved to be an excellent way to speed up the making of this pattern. Hope you enjoyed the process and the final trivet.


Nice work Jon and fantastic write-up! I really enjoy this pattern, it’s nice both on a small scale (single) and as it expands outward into a larger format.
Thanks Brian,
Yeah it is a nice pattern. At some point I would like to build a larger shoji screen and see how this pattern looks over a larger area. In the meantime though there are many other patterns I’d like to learn to make. Next up I think will be some of the hishi-gata patterns.
-Jon
Harika olmuş, çok yararlı bilgiler aldım, teşekkürler
teşekkür ederim!