
It’s long overdue, but at long last I have some images of the finished modular tansu cabinets to share. I finished this project up back in February, but that was followed by crating and shipping which was a bit of an ordeal, and I was hesitant to share any images until the cabinets were safe and sound in the hands of the customers in the US. Shipping took place in March and after a couple of weeks they arrived in LA and were brought to the client’s home. Shipping anything overseas can occasionally be a challenge, but shipping large items like these cabinets that took months of time and effort to build, makes me especially nervous. To top it off international freight shipping is not the most transparent process, and while ultimately everything went smoothly, there were a few minor hiccups along the way that definitely added to an already stressful situation.
The one aspect to shipping that I could take full control over was packaging. I ended up building individual plywood crates for each cabinet, lined with foam sheets for padding. I really dislike using foam, and avoid it as much as possible, but this was one occasion where it felt necessary. Each cabinet was wrapped with cling-wrap to protect against any potential moisture issues, and then protected on all sides by 1″ thick foam sheeting and 1/2″ plywood which was doubled up around the perimeter.


Before crating and shipping the cabinets, I couldn’t help but haul them into my house to take some photos. The scale of the cabinets don’t exactly fit in an old Japanese house like mine, but it was still nice to see the full arrangement together and offered an opportunity to take some photos.

One detail not covered in the previous posts was staining of the two upper tabi-dansu inspired cabients. I used variations of chemical stains which react with tannins in the wood to achieve the colors on the upper two cabinets. The color of the lower cherry cabinet is all natural, and was somewhat light when I took these photos, but I expect the wood will start to darken up quickly with some UV exposure. All the cabinets received a coat of Osmo oil.

Here’s a close up of the keyaki tabi-dansu. I really like the grain on this piece. Nice straight grain throughout.

And here are some details of the custom hardware that I covered in the last post.

Solid brass parts and with a hammered finish.

I textured the door pull handles on the show face only, which had the effect of introducing a slight curvature. It’s a subtle detail but I think the curvature adds a bit of interest and make the otherwise simple form of the door pull a bit more interesting.

Below you can see the mounting hardware for one of the door pulls. I textured a series of brass plates to protect the wood from the nuts and lock washers. I used brass parts throughout and blackened everything to match the pulls.

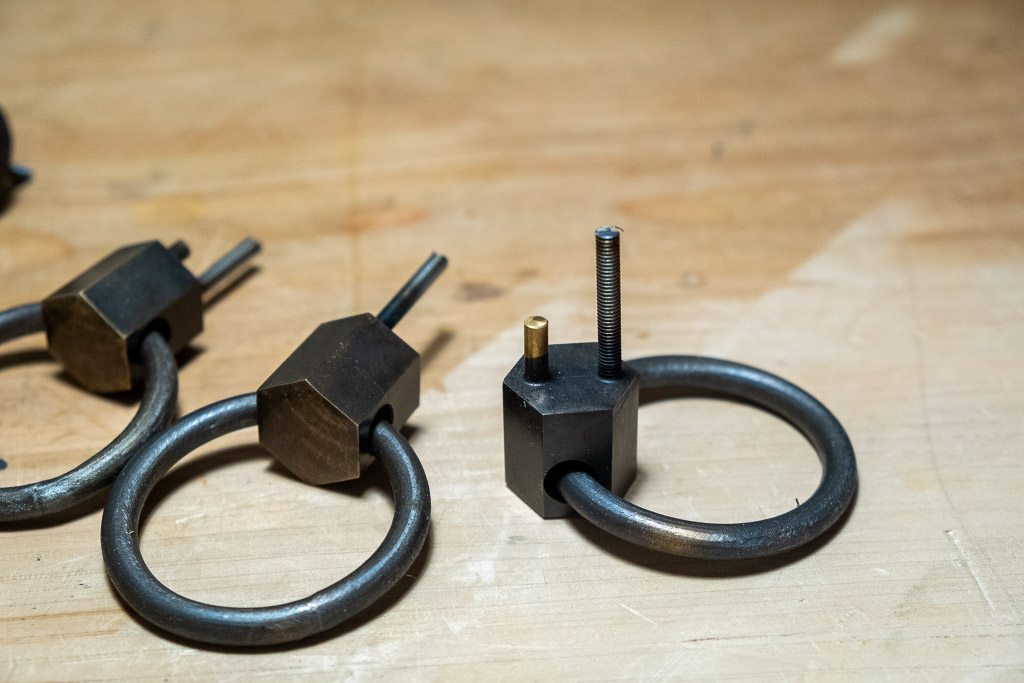
Here’s a look at one of the drawer pulls installed on the cherry cabinet. The rings have a lightly filed finish, while the main body has a slightly rounded and hammered textured on the front face.


I kept the mounting hardware for the drawer pulls a bit more simple, using just a nut, lock washer and flat washer. Each drawer pull has an additional pin soldered parallel to the mounting bolt which is embedded in the drawer front to prevent the pull from ever spinning.

I went with half-blind dovetails for the drawer construction. A classic and sturdy construction.

The interior components of the drawers were made with hard maple, and I joined the backs to the sides using dadoes and pegs. The drawer bottoms are also solid maple which float in grooves, and are secured to the drawer backs with a single screw and slotted hole to allow for wood movement.

The drawer fronts all came out of a nice quartersawn board of cherry with some beautiful figure that really popped after hand planing.

Here’s a peak at the design of the cabinet back; maple tongue and groove slats secured with dovetailed battens (on the backside). I’m a big fan of using light colored woods like maple for the interior of cabinets to brighten things up. All three of these cabinets received a maple back in the same style for consistency.

I was planning to go into detail on the construction of the cabinet backs in a separate post, but in the interest of moving this series along I’ve decided to just show a quick glimpse into their construction. I designed the back panels to use narrow thin slats to keep the weight down, while also giving plenty of flexibility for wood movement. I also wanted the backs to have as much racking resistance as possible, so I incorporated dovetailed battens which are mortise and tenoned into the surrounding frame. Each slat slides onto the dovetailed battens while also engaging with the surrounding frame using tongue and groove joints. The whole assembly is really solid.


A view from the backside of the low cherry and keyaki cabinets shows the battens and surrounding framework in a bit more detail.


Looking again at the interior of the cherry cabinet you can see some of the wedged through mortises used to secure the drawer dividers.

The clients requested a special spacing for the shelves on this cabinet, with the intention of storing dining ware like trays and platters among other things. The upper shelves are joined with blind mortise and tenon joints, while the lower one uses wedged through tenons.

One of the final components I fabricated was the base for the low cherry tansu. The legs join the long rails with bridle joints, and the cross pieces joint the front and back halves with double tenons which you can see below. I had planned to reinforce the base using brass, but wasn’t able to source any in the size required, so I ended up using angle iron. The angle iron is hidden out of view and connects the base to the cabinet, while providing a lot of resistance to the cabinet sagging.

Here’s a look at one of the mitered corners on the low cherry tansu. There’s a lot of invisible dovetails inside these corner joints, and that should make for a super solid connection in the long run. Miters are never easy, so it’s always nice to see when they close up nice and tight.

All the doors on these cabinets use a ken-don (倹飩) style construction, where the doors are secured by sitting in grooves in the top and bottom of each cabinet. To open one of the doors, you lift the whole thing up into the upper groove which is extra deep, until the bottom edge of the door clears the lower groove, then swing the bottom out and the whole door can then drop down and swing open. It’s sounds complicated but the process is actually really simple. I took a short video showing the operation of the doors below. The video also gives a greater sense of the scale of these cabinets.
Well that’s it for this project. Thanks to all who have been patiently following along. These cabinets were a long time in the making, and were definitely the most involved furniture project I’ve done to date. I tried to cover the most important details involved in the fabrication, but there’s plenty that I didn’t cover, so please feel free to reach out with comments or questions.
Since finishing these cabinets I’ve worked on a few other commissions including a new set of 4-leg stools with curved stretchers (a variation of my 3-leg stool design) and I’m really hoping to do a post on that sometime soon. I’m also deep into house renovation work these days and hope to also continue the series of posts I started about that as well. So stay tuned.
Thanks for reading.
Holy cow, congrats on finishing the project (posts)! The fine details came out beautifully. The keyaki tabi-dansu is really sweet.
I didn’t know the word ken-don before, but the concept came up in Jay’s class today with installing shoji sliding doors in their tracks.
Hope all is well!
Thanks Martin. I really appreciate the kind words. The keyaki tabi-dansu is definitely my favorite from the set as well. I really love the grain on that piece.
I’m a big fan of ken-don doors. Definitely the same concept in regards to how shoji are installed. Ken-don doors for cabinets really open up some unique design possibilities since you can completely do away with any hinges.