
I first designed and built this stool 5 years ago in Brooklyn, and wrote about the build in one of my early blog posts here on this site (you can see that post here).
Here is the finished stool from 2017.

As part of my early practice using Blender I decided to draw the stool in 3d and play around with some renderings of the design. I don’t have any of the original detailed drawings/specs with me here in Tokyo, that stuff is back home in storage in MN, so I started mostly drawing from memory. It’s a pretty simple stool so I was able to approximate the details pretty well.


The rendered stools above and the original design are counter height stools, but I also wanted to make a shorter version. So I went back into Blender to shorten up the size, and made a few other changes as well. I thinned out the legs and made them a more even taper top to bottom. I also raised the height of the curved stretchers. Overall I like the result of these modifications a lot. The stools have a more elegant look I think.


So I decided to forge ahead with this new revised short stool design, and started to cut some wood. I ended up making 3 stools, one in Japanese ash (tamo), one in cherry, and finally a Japanese chesnut (kuri) version.
The first couple of stools I built were the ash and cherry versions. Since I had reworked the stool’s dimensions and it had been 5 years since the last time I made this style stool, I was essentially starting over. Meaning there was a fair bit of problem solving and head scratching to work out the specific dimensions and process. The curved stretcher were the most difficult to figure out. The location of the cuts for the curved stretchers, their specific curvature and the the length of each segment, where to cut and join them, as well as the tenon and shoulder cuts where they meet the legs, were pretty tricky. Essentially I made the first couple of stools without jigs, making cuts that left generous room for trimming and fine tuning. Once I had the first finished stool I could then use the specific dimensions of the complete parts to finalize my dimensions for making jigs and speeding up the process for future production. There were also quite a few mistakes along the way, but by the time I got to the third stool, I had the process down.
I didn’t take pictures of every aspect of the build, but tried to get good shots of the more challenging tasks. So here we go. Starting with the curved stretchers, which are bent laminations. There are 5 laminates total at 2 mm thick making the finished glue-up 10 mm thick. I used regular titebond for the glue-up, and after the glue dried and I pull the piece out of it’s form, it hardly moved at all. I’ve had pretty good luck with titebond for bent laminations. The glue seems to hold firm against the wood wanting to spring back.

From there I cut three segments out of the single piece pictured above. Eventually I made a jig for cutting these segments to equal length, but for this first couple of stools I worked more free hand, using full scale reference drawings to determine the length I needed. I thought I was cutting this pieces with plenty of extra length, but I later realized they were too short and ended up redoing this process.

Next I cut a flat plane where the stretchers join, creating a clean, wide surface for gluing the three pieces together. Again my apologies for the scant pictures showing how I cut these flats. I ended up making a jig and using the table saw to cut these flats, which worked out okay.

Here are the pieces being glued up.

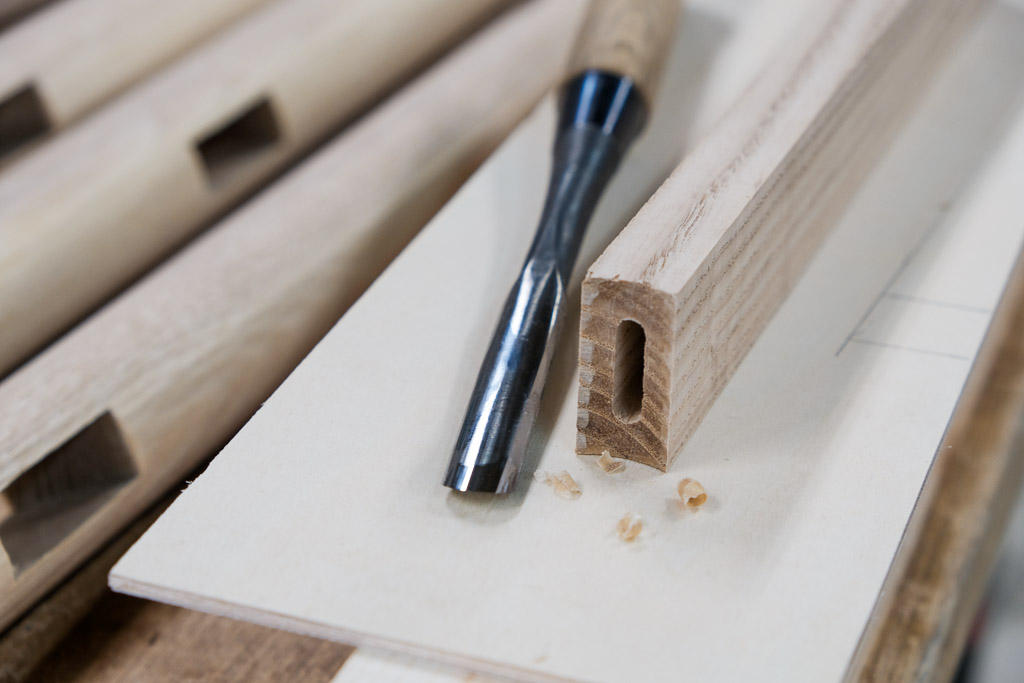
From there I cut the mortises in the legs where the curved stretchers will join. Here I’m using an angled block to prop up the leg for cutting a mortise at around 78 degrees, accommodating the legs 12 degree tilt.

With the mortises cut I chucked each leg in the lathe and turned them round and gave them a pretty strong taper.

I happened to have the foresight to layout and cut the tenon shoulder where the seat and legs join before turning. This worked out really great. It was a simple task to layout the location of the shoulder with the proper angle while the leg was square. Then I simply cut along my layout lines with a hand saw leaving a 21 mm tenon.
Here you can see the fine saw kerf defining the angle tenon shoulder after turning one of the ash legs.

After turning I handplaned the legs smooth using a flat kanna. Those who have been following this blog for a while now have heard me talk about handplaning round stock with a flat kanna before. I’ve done this on the original stool, chair no.1, and most recently the toshi-nuki shelves. When light hits all the little facets left by the kanna, it really creates a more dynamic surface and accentuates the linear grain.

After planing I started to look at fitting the stretchers and the legs. I cut the tenons for the curved stretchers using a really basic jig to vertically hold the stretcher assembly for cutting the tenon cheeks using the table saw (similar to a standard table saw tenon jig). That worked out okay but I’m still searching for a better solution that offers easier fine tuning of the tenon thickness. 5 years ago I cut the tenons using a mdf shop made jig that was inspired by one of Pat Warner’s tenoning jigs. That worked out pretty well at the time, and I may try to work out something similar here in Tokyo. But I also realized I could pretty easily use a tenon cutting table saw, unfortunately the shop where I’m working doesn’t have one. But I can dream.
Back to fitting the stretchers and legs. Below you can see I’m at the point where I need to cut the shoulders of the tenons to fit the legs.

I used my handy-dandy scribe to transfer the shape of the legs onto the stretchers. This scribe is a simple piece of brass folder over a sharpened steel rod. The two are soldered together, and the rod is hardened by heating until red hot and then quenching. The brass is folded over such that it tightly grips a pencil, making adjustments easy while securely holding the pencil in place.

Here you can see the first scribe lines. The liines aren’t perfect, but the first scribe is always a bit rough. The goal is to quickly get the fit between the stretchers and the legs to about %90, using whatever tool works best. I used soto-maru nomi for cutting the curved parts and flat nomi (chisels) for the straight cuts.

Here is the ash stool, after scribing the second time. From here things are pretty close. Just a touch more trimming. My goal when scribing/trimming is for 3 rounds; a rough scribe to get me 90% there, followed by two more round of fine tuning. I rarely get it right in 3 rounds, but every time you do this you get a bit better and faster.

When the fit is close with just small gaps remaining it can be difficult if not impossible to use a scribing tool like the brass one above, for marking. But I’ve found a dull pencil to actually work pretty well. The fat lead will ride along the surface of the leg providing a slightly offset mark onto the stretchers.


After final trimming, here’s how the final fit came out.

Even though I precut the shoulders of the leg tenons where they meet the seat, the fit still requires a bit of fine tuning. Here’s a trick that I learned doing carpentry work here in Japan, that works great for this kind of situation. Essentially the technique involves using a hand saw to carefully cut the shoulder of the joint. Since the saw is resting on the surface that the shoulder is mating to, it’s easy to get a really clean fit with minimal effort.

I use the saw to cut all the way around the perimeter of the shoulder, being careful not to cut so deep that I hit the tenon. Here you can see where I stopped cutting about half way from the surface of the leg to the tenon. Cleaning up that little step is a simple job with a sharp chisel.

The rest of the stool build was fairly straight forward. I cut the seats round on the lathe, and then used a nankin-ganna (Japanese spokeshave) to smooth out the surface and add a subtle round profile to the edge of the seat. For assembly I glued the tenons, and cut and wedged the round tenons in the seat.
Here’s how the three stools turned out.


As for finish, I used a soap finish on the ash stool, to keep the color nice and light. For the cherry stool I used Kreidezeit, and oil finish mix. And for the Japanese chesnut stool, I first stained the wood using a soda-ash solution. On a few occasions working with Somakosha we used lye to stain chesnut. Lye, soda-ash, and baking soda will all react with tannins in the wood turning the natural pale color a rich brown. Here’s you can see the difference between the natural chesnut and soda-ash dyed chesnut.

The color change is pretty dramatic. Once the surface dried I applied Kreidezeit as well.
That’s about it for this updated stool build. I promise to take more detailed shots next time around, including shots of the jigs that I’m using. I just got back from Nagano where I showed these stools off a bit, and was glad to get a really positive response. It’s great to be able to show people in-person the details, such as the hand planed surfaces and joinery.
Thanks for reading.
-Jon
Beautiful work Jon, as usual.
Thanks Deck!
Your knowledge and use of wood finishing techniques is really inspiring. Thanks for sharing. Plus, your meticulous fitting of the tenons to the legs really helps. I’ll be making a scribing tool like yours today. Great post.
Thanks Rich. Good luck with the scribing tool. They are pretty handy little tools and fun to make. As for finishing, I’ve always found it interesting to experiment with finishes and have had the opportunity to gather little tidbits of information from other woodworkers/books/etc over the years.
How did you learn Blender? Any tutorials that are particularly well-suited for woodworkers?
I started learning Blender by following along with youtube tutorials. I highly recommend BlenderGuru’s donut series. He also has a good series on making a chair, but really any of his videos are handy. I never found any woodworker specific tutorials, instead I just started to play around with the program after learning the basics. I ran into a lot of walls along the way but the great thing about Blender is that the support community is huge. I’ve been able to find the solution to pretty much any problem with some internet searching and youtube tutorials.
Do you also use Blender for generating production drawings after you’re satisfied with the 3d model?
I have a couple times, but it’s not a very straight forward task. So I’ve started to just take dimensions off blender and make 2d drawings by hand.
That’s great that your stools were well received, I’m not surprised! It’s hard to see, but it looks like your darkest stool doesn’t have the through tenon, out of curiosity which one received greater attention, I’m still on the fence. I just looked up Nagano, certainly looks beautiful there, is that a hub for traditional crafts? Maybe next time you’re there it would be great to see some pics of the local historical buildings from your perspective, I can see that you’re good at photography.
Thanks Brendan. Yeah the dark chesnut stool doesn’t have through tenons. It was a bit of an experiment to omit the through tenons to make the design a bit cleaner and to speed up the build a little bit. On the cherry and ash stools with through tenons, I spent a lot of time fitting the joints to have a gap free finish where the tenons exit the legs. By not doing the through tenon, I definitely was able to finish the stool faster. Design-wise I think it also looks cleaner, but I can also see it working either way. I didn’t have any customers comment on the lack of through tenons on that stool actually. It was interesting to see what details customer are drawn to and clearly notice, and what details no one seems to pick up on.
It was a pretty whirlwind trip, without any free time to explore the area, but next time I’ll try to take some travel photos.
Thanks for the comment,
Jon